I'm not going to lie. Making bagels is a little bit of work. With regular bread, you can just start it rising and mostly forget about it for a while. Bagels take a little bit more hands-on time. But they're so worth it. Shane has been begging me to make them for weeks, so I finally did. The recipe is one I got from a friend, who not only has a culinary degree but who used to work at our local bagel shop: Lulu's Bagels. It took him a while to write down the recipe because he had to convert it in his head, down from a starting point of 50 lbs of flour to a more reasonable amount for a home cook.
Bagels
2 cups of warm water
1 1/2 teaspoons of yeast
1-2 tablespoons of brown sugar
Flour
Just as with the liquid for all other yeast breads, it should be warm but touchable. If it's going to scald your finger, it's too hot for the yeast. Mix the water, yeast, and sugar and let the yeast proof for about five minutes, until it's puffy. Then mix in enough flour to have a dough that's still somewhat tacky to the touch. At this point, you could also mix in any spices (cinnamon, sage, etc.) that you'd like. For a dough like this, "to taste" is your guiding measure for spices. If you want lots of cinnamon, several teaspoons works. If you just want a hint, maybe you only want half a teaspoon.
Turn the dough out and knead it for a couple of minutes. Oil it, put it back in the bowl, and let it rise until doubled.
When it's risen, turn it out and give it a quick kneading. Just a few turns should be fine, but it's easier to work with if the air bubbles are mostly gone. If you want to add any dried fruit, this is the point I do it at. It's easier to work them into the bagels when you're forming them, I've found. For my purposes, I made a double batch and only added cherries to half the dough, so if you think you see two different types of dough, you do.
You'll want to pinch off a bit of dough, about the size of a mandarin orange.
Then, you'll need to start rolling out the dough into a rope about 7-10 inches long.
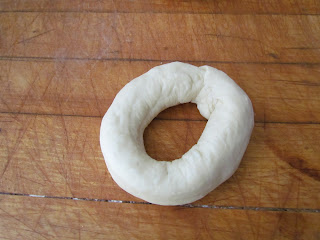
I'm sure you can figure out the next step. Take the ends and sort of wrap them around each other, leaving a nice big hole in the middle. Make sure the ends are firmly together, though, because you don't want them to come apart in the next steps.
Put them on a flat, greased surface (such as a baking sheet) to rise for just a short time. About half an hour should do it. Don't worry if they don't look big at that point. They'll puff up later, when they're boiled. That's right, you'll need to boil them. I've done this in a number of different pots, but the best one is a wide, low pot. You don't need a lot of water, just enough to have them floating in it and wide so that they have plenty of space. It should also have a lid, to keep the moisture in. A tall pot will work too, but it will be harder to get the bagels in and out.
Once your half hour is up, and the water is boiling (it doesn't have to be at a rolling boil, but it does need to be hot) gently lift the bagels and drop them into the water. See why the ends need to be firmly attached? I tend to use a large spatula (the same one I use for pancakes) to lift them. I can use the same tool to gently lift them out of the water when they're done being boiled. Whatever side was down on the greased sheet is the side I want down in the water. The first time I made bagels, I flipped them to make sure both sides were boiled equally. The second time, I realized that wasn't necessary. Keep the lid on while the bagels are in the pot and the top will cook well enough while still looking nice.
How long will you need to boil them for? That depends on how chewy you want the bagels to be. If you don't like a lot of chewiness, less time is preferable. So play around. I don't actually time it, but I boil mine for about five minutes. This gives them a fantastic chewiness without making them actually tough to eat.
After they've been boiled, you'll see how much the water has puffed them up. They'll pretty much double in size. (This picture doesn't do it justice. Trust me, the ones on the left are waaaaay bigger.)
They're obviously not totally done when they're done boiling, though. After that they'll need to be put into a 375^ oven for about half an hour, or until golden brown. (This is where the already greased baking sheets come in handy--the bagels won't stick.) Give them a few minutes to cool when they're out of the oven, then devour. Because they are a bit of work, I do tend to make a double batch all at once so that I can freeze some. It's not much more work to make two batches than one, and this way you also don't need to feel obligated to eat bagels every day so they don't go bad.
Enjoy!


No comments:
Post a Comment